Hyper -V Live Migration, Storage Live Migration, Shared Nothing Live Migration

Difference between Storage Migration and Shared Nothing Live Migration
Storage Live Migration – provides the ability to move virtual machine’s storage from one diskt to another while VM is running with no loss of application downtime
Shared Nothing Live Migration – provides the ability to move virtual machine from one host to another over just a network cable. From Windows Server 2012 R2, when we enable Live Migration on a Hyper-V host we will be able to use additional features in Performance options like TCP/IP, Compression and SMB.
The following steps will demonstrate how to enable, configure, and move a VM/Storage between Hyper-V hosts.
LIVE MIGRATION (Shared Nothing)
Before moving virtual machines with Live Migration, we need to enable and configure it on both source and destination Hyper-V host.
Inside Hyper-V Manager, right-click on the name of your Hyper-V server and choose Hyper-V Settings

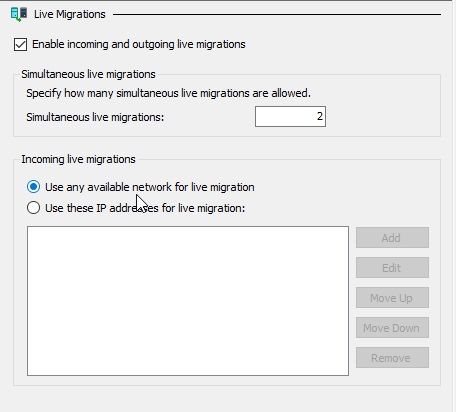
Click on Live Migrations in the left-hand pane and enable it by clicking on Enable incoming and outgoing live migrations.

Under Simultaneous live migrations, specify the number of simultaneous live migrations, and under Incoming Live Migrations choose between the Use any available network for live migration and Use these IP addresses for live migration options. I’m going to leave these at the defaults.
Now we need to choose which Authentication protocol we want to use, and to do that we need to expand Live Migrations and then select Advanced Features

Use Credential Security Support Provider (CredSSP) is the default option. I will change it to Kerberos and for this authentication protocol we have to configure constrained delegation i Active Directory. Under Performace Options, Compression features is enabled by default but you can choose a different option if it’s appropriate for your environment. Click OK

We are done with the source Hyper-V host. Do the same process on the destination Hyper-V host (In my case it will be HVTEST02)

Next step is to configure Constrained Delegation in Active Directory. Open Active Directory Users and Computers, in the navigation pane, expand your domain (In my case MEHIC.SE) and click on OU where you have your Hyper-V servers. Default is Computers OU but I created on just for my Hyper-V servers (Hyper-V Servers OU). Right-Click on your first Hyper-V Host, HVTEST01 and select Properties.

In the HVTEST01 Properties, Click the Delegation tab. On the Delegation tab, click the Trust this computer for delegation to specify services only, then click Use Kerberos only and Click Add.

In Add Services window, click Users or Computers and add destination Hyper-V host. When it’s done click ok.


In Add Services Window, select both cifs and Microsoft Virtual System Migration Services service types, and then click OK.


In HVTEST01 properties window, confirm that both services are listed and then click OK.

Do the same process on HVTEST02.

Let’s perform Live Migration
In Hyper-V Manager, right-click on the virtual machine you want to migrate, and then click Move

Before you begin page will pop-up. Click next
On the Choose Move Type page, select Move the virtual machine and then click Next.

On the Specify Destination Computer page, in the Name field, type HVTEST02, and then click Next.

On the Choose Move Options page, select Move the virtual machine’s data to a single location and click Next

On the Choose a new location for virtual machine page, specify a location on the destination computer where you want to store VMs data. In my case it will be C:\Live Migration folder and click next and finish

Migration is in progress…

After live migration completes, in Hyper-V Manager, confirm that RDS01 is no longer running on HVTEST01.


Storage Live Migration
The following steps will show you how to migrate the virtual machine storage to another location while the VM is running
On HVTEST02, in Hyper-V Manager, right-click RDS01, and then click Move

Before you begin page will pop-up. Click next
This time choose Move the virtual machine’s storage and click next

On Choose Options for Moving Storage page, click Move only the virtual machine’s hard disks. I will move only hard drive (Storage) and not all of the VMs data.

On the Select Items to Move page, Select the virtual hard disk and then click Next.

On the Choose a new location for attached virtual hard disk page, specify a location for the virtual machine’s virtual hard disk, and then click Nex and finish

Process is in progress….

After Live Storage Migration completes, in Hyper-V Manager, verify the virtual machine new storage location

No comments:
Post a Comment