Windows Containers 2016 & Hyper-V Containers – Part 2

So to set up Windows 10 or even Windows Server to connect to a Docker Engine remotely, we’d follow the same steps. Open Powershell on your Windows 10 or Server 2016 as admin and type in
$package = “https://download.docker.com/win/static/stable/x86_64/docker-17.06.0-ce.zip”
We are creating a variable that references a zip file hosted on the Docker website.

With our second command we invoke a web request to download that package and to store it in the temp folder locally, in a file called docker.zip.
Invoke-WebRequest $package -OutFile “$env:Temp\docker-17.06.0-ce.zip” -UseBasicParsing

Once a download is complete, we will need to extract that
Expand-Archive -Path “$env:TEMP\docker-17.06.0-ce.zip” -DestinationPath $env:ProgramFiles

Before we continue let’s dobule-check the the installation directory and you can do it from powershell by typing
ii $env:ProgramFiles
Everything looks good. There we have or docker client and dockerd engine. We are going to use docker client.

Let’s go back to powershell and run our last command
[Environment]::SetEnvironmentVariable(“Path”, $env:Path + “;$($env:ProgramFiles)\Docker”, [EnvironmentVariableTarget]::Machine)
This command let us run the Docker Client regardless of what directory we are in, in the terminal.

In order to connect to Nano server where I actually configure the Docker daemon or the Docker Engine to listen on that remote port, I’ll run the docker command just like I normally would, but I would use the -H flag to tell it where to connect to, so this would be tcp:\ then the IP address/hostname on my server which was nano-hv01:2375. So 2375 was the port number that we set in the daemon.json file and something we would like to do for example to check the version
What we can see here is that the client can communicate with Nano server and we can see version

So remember that the steps that we took to configure the Nano Server for remote connections, we can do this on Windows Servers with a desktop or Windows Server Core machines that are acting as container hosts running Docker, but it’s definitely something that you’re going to have to do for Docker hosts running on Nano Servers.
BASE CONTAINER IMAGES
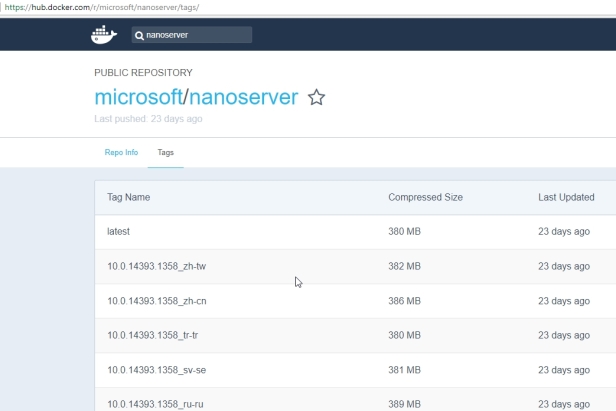
Now that we’ve deployed our container hosts on Windows Server 2016, we can move onto downloading container images and we can start running our containers. To be able to do that we will need to pull our base container image from an image registry, in this case that’s going to be the Docker Hub and the Docker Hub is the default image registry and it contains official repositories from vendors like Microsoft, it also has unofficial repositories from end users like you and me, but the official Microsoft repository has a bunch of base container images that we can use to start running our own containers.Let’s browse to https://hub.docker.com to download for example nanoserver image.

Type in nanoserver in search and you will see a bunch of different images. That what we are looking for is the microsoft/nanoserver so click on it.

This is the official public repository for the Nano Server base operating system image. So you can see that the Owner is Microsoft, and you can see the image name includes the repository and the image name, so it’s microsoft/nanoserver. On the right-hand side you can see that we have an example of how to use the Docker Client to pull the Nano Server image.
Just to point that you will run this command on the container host.
docker pull microsoft/nanoserver

Let’s see how this work. I will open powershell on my container host (It is a windows server 2016 with GUI. OBS!! I have both gui and nano server container host) and run that command.
So as you can see it’s kicked off the download process, it’s actually pulling individual layers that support this image, it’s pulling the latest version of the Nano Server image.
Notice right after we ran the pull command you can see that it says using default tag: latest. So by convention the latest image version is usually tagged with that term latest, and then there’s going to be previous versions of different images that you can download as well and you can specify the tag when you run the Pull command. If you don’t specify the tag like I did, it’s just going to pull the one tag that’s latest.

If you would like to use another version you would need to click on Tags and choose which one you would like to use.
So for example if you would like to pull older image you would need to specify the tag
docker pull microsoft/nanoserver:10.0.14393.1198
You will notice that there’s already one layer of the image that already exists on the local machine.

Now we have two versions of the Nano Server image on the server and we can check that by running docker images

If the nano server image is not an option for your environment you can download Core image. Unfortunately Server Core is a bigger OS image, but it’s still going to be less than what you’ll deal with in a virtualized environment with virtual machines. To install it, run
docker pull microsoft/windowsservercore

RUNNING WINDOWS CONTAINERS
Now that we have base container images pulled down, let’s go ahead and take a closer look at running containers. We’re always going to use the Docker Client and then we’re going to use a subcommand like run. Now there are a lot of options you can use and to see those you can run docker run –help

There are two ways that we can do a docker run, we can do an interactive run of a container and we can also do a detached run so it’s running in the background. I’m going to use the -it flag to indicate that this is going to be interactive (use -d to run it detached), and then we’ll provide the image name and we’ll do microsoft/nanoserver, and then when that container starts I’ll tell it to execute the cmd.exe process
docker run -it microsoft/nanoserver cmd
(OBS!!! If you remember we downloaded 2 images. If you don’t provide a tag it’ll use the latest version of the image. If you would like to use older one you would need to run docker run -it microsoft/nanoserver:10.0.14393.1198 cmd)
When you run that command the shell console will become black and now I’ve got a cmd.exe process running in the Nano Server.

If I run something like hostname you can see that we get a unique ID coming back from that container,

Now if you type in exit and hit enter, you will stop the container (it is because we started it interactively with -it. If we used -d then exit command would not stop the container) so the way of getting out without stopping it is to press CTRL+PQ on your keyboard. You can see that the prompt on the screen changes. So now instead of having C:\ I’ve got PS C:\ and based on that I can tell that I’ve been disconnected from the container,

If you would like to see if you have any running container you would need to run docker ps command. That command will give us a process list of running containers.

To stop the container you would need to type in docker stop <and then the container ID>
OBS!!!! It is enough to type in for example first 2 numbers, in this case 21, you only need to provide enough of that ID to make it specific and disambiguate it from other containers. When you stop the container you will not be able to see it if you type in docker ps. You need to type in docker ps -a to see all the containers.
To start the container you can use docker start 21

Maybe you have notice the funny name festive_ride. Now in addition to container IDs, you can actually name these containers and if you don’t provide a name a random one will be chosen for you. Obviously that’s not a very meaningful name so let’s change it.
docker rename festive_ride windows_container01

To create a new container with specific name we can run
docker run -it –name windows_container02 microsoft/nanoserver cmd
Now if you want to stop/start etc…. container you can use name instead of ID

Let’s remove windows_container02. The command is docker rm and if the container is running you will need to specify -f (force) to remove it. If you don’t do it the only way will be to stop it first. Let’s see example with -f and without.

One of the things you’re probably wondering is once a container is running how do I go back and interface with it again, or how do I get into the container to run some commands? We can get back into container with exec command
docker exec -it <container name or ID> <process that you would like to run>
One more thing I would like to mention and that is the command called inspect. If you run docker inspect and provide the container name or the container ID, you can actually get an output of all the settings for the container in the json format. It will give you all the info you would like to know for this container, the IP address, the command it’s currently running, what time it started etc.
docker inspect <container name or ID>

HYPER-V CONTAINERS
In order to run Hyper-V containers, you’ll actually need to install the Hyper-V role on your container host. If you are running container host as a virtual machine then you will need to enable nested virtualization. I have my container host VM already (ContainerVM) which I will use for this as well.Before I enable Hyper-V role on it, I will need to configure few things to set this up. First power off the VM. Next thing on your Hyper-V host open powershell as admin and type in Set-VMProcessor -VMName ContainerVM -ExposeVirtualizationExtensions $true
This is basically going to let the virtual machine believe that it has hardware virtualization capabilities, and then the other thing that you want to do is make sure that your container host has at least two processors

The next thing you should do is run Set-VMMemory and disable Dynamic Memory.
Set-VMMemory -VMName ContainerVM -DynamicMemoryEnabled $False

The last thing is to enable MAC Address Spoofing. This needs to be done on the network adapter.
Get-VMNetworkAdapter -VMName ContainerVM | Set-VMNetworkAdapter -MacAddressSpoofing on

Now we are ready to start the VM and install Hyper-V role and that’s the last thing I need to turn that container host into a machine that can host Hyper-V based containers.
If I run docker ps -a I will see my 2 containers which we created before.

To be able to create Hyper-V container we will need to run
docker run -it –name windows_container03 –isolation=hyperv microsoft/nanoserver cmd
You will notice that it’ll take a little bit of extra time for you to run a container that’s using Hyper-V based isolation, that’s because it’s not using the host OS kernel, it’s got its own kernel and its own virtual machine

Now how do we know which one is hyper-v container?
If you remember docker inspect command, that command shows us the settings of the container so if I run that command agains windows_container01 (ID 21) I will get settings in json format and the part that I am interested in is the Isolation.
Isolation: process means that this container is sharing the kernel with the host operating system and it’s not running inside a virtual machine.
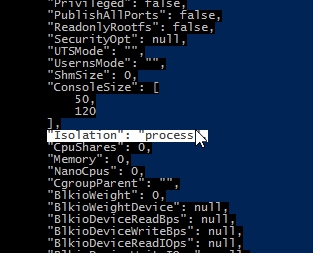
If I run the same command agains 0d I will see different isolation setting

There is a little bit easier way of checking this and that is this command
docker inspect -f “{{.HostConfig.Isolation}}” <container ID or name>”

Just to reiterate, to make sure that it’s clear in your mind, the first container using process isolation is sharing the kernel with the operating system, the second container using Hyper-V isolation is actually running inside a virtual machine, it’s got its own kernel. And that might make you think that you would actually fire up the Hyper-V tools and actually see a virtual machine in there, but that’s not the case. So keep in mind that when you’re working with Hyper-V isolated containers you’re not going to see them in the Hyper-V tools, that’s actually a good thing because we don’t want to confuse them with real virtual machines, we’re just using the Hyper-V technology for an additional layer of isolation.
No comments:
Post a Comment