How to Deploy and configure DNS 2016 – (Part6)
")
In our last 2 parts of How to Deploy and configure DNS 2016 we will continue with advanced DNS options and security.
What this part covers
- Configure DNS Socket Pool and DNS Server Cache Locking
- Configure DNS Logging
- Response Rate Limiting
- Selective Recursion & DNS Query Filtering
- DNS Performance Tuning
Configure DNS Socket Pool and DNS Server Cache Locking
- DNS Socket Pool
When a DNS server, or a DNS client is making a request to a DNS server, that server, or client makes the request typically over an existing well known port. That port is most commonly TCP/53, and also UDP/53. These two are the ports recognized for use by DNS.

Now, what’s interesting, however, is these are the destination ports. So, if you think about TCP/53, and UDP/53, these are the ports that are open on the server being asked the question. If my DNS Server DNS01 is attempting to make a request on DNS Server DNS02, it is going to do so over TCP/53. Now, what was not really paid attention to, at least early on, was the fact that the source port over on DNS01, source port prior to the implementation of DNS socket pooling, could’ve been the same port, and because of that, it became far too easy for some attacker to actually inject the wrong answer into that port if they were paying enough attention.

Now, what socket pooling does, it tells the server to go ahead and randomize the source port from where the actual request is coming from. So, maybe 2 ports, or 100 ports, or 1000 possible ports from where the actual request could come from. When you have that many possible ports that the request could come from, it makes it much more difficult for our would be attacker to actually send the wrong information back into the listening port. You have to know the port number, and more information about the exact transaction that’s occurring. Now, As I said it is enabled by default, but there is the ability for you to configure the size of the socket pool, to increase it to a larger number of ports, that the DNS server could use for sending requests. Increasing the socket pool size just literally increases the number of source ports from where those requests come from. And the way in which you can actually enable it, happens by running the command, and it’s not a PowerShell command, but I’m going to use PowerShell, the command dnscmd. By default, the socketpoolsize is 2500 and we can check it with command dnscmd /info /socketpoolsize

If you would like to change this you can do it by running dnscmd /config /socketpoolsize —> for exemple 5000

- DNS Server Cache Locking
That could occur prior to the TimeToLive value expiring by some would be attacker overwriting the cache entry, or it could happen by a would be attacker actually constantly requesting the information from the server to see when the actual TimeToLive value expired, and immediately updating the cache with its own incorrect value. Cache locking adds an additional layer of protection onto those entries that exist in the cache by preventing them from being overwritten for a percentage of time of the entire TimeToLive value. Now by default, that’s going to be 100%. The TimeToLive value for that entire period of the TimeToLive value, the actual entry cannot be overwritten. You can adjust that down to another percentage of the TimeToLive value, but the 100% is actually the default. You can check that by running
dnscmd /info /cachelockingpercent

In most environments, you’re never going to adjust this, because it is configured by default, but if for some reason you should want to actually reduce the amount of time that a record in your cache can get overwritten, you can do so with the dnscmd /config /cachelockingpercent, and then a particular value, so 50, or 75, will adjust what the cache locking percentage is.

So, long and short of it is that cache locking is a feature that exists that you should know about, but will probably never adjust.
Configure DNS Logging
You can configure the DNS server to essentially write events to the event log each time a DNS server setting is changed, each time a DNS zone setting is changed or each time a DNS resource record is changed. Now, in high security environments where you want to keep track of what’s going on with your DNS server, you definitely want to have logging enabled.There are two different places where DNS logging can be configured, depending on the kind of information you’re trying to pull off of your DNS server, both of which are configured are under the Properties of the server name itself, the first of which being the Event Logging tab. Now the Event Logging, this is going to actually log the administrative, kind of large scale events that happen to a DNS server. You can configure all events, events and warnings, just errors, or no events, and these you’ll find actually in the Windows Event Log of the server that’s running DNS services. These again, are the large scale events.

Debug Logging
It can happen that you will need to dig a little bit deeper into the actual communication that’s going on between your DNS clients, and your DNS server and the way in which you can accomplish that is under the Debug Logging tab, which does not log its information to the event log. Instead, it logs it to a particular file path and name. This one is disabled by default simply because it does get very noisy and it’s going to generate a lot of information. Typically, you’ll want to determine exactly the information that you’re looking for, like packet direction, protocol type and contents, and you may actually want to tailor it down to specific IP addresses as well, just to keep your logs as clean as possible. You will surprisingly find yourself occasionally having need to do debug logging on a server. This can happen fairly commonly when you have migrations going on, when you’re trying to determine if a particular zone has been abandoned, and that there are no clients attempting to request information about the resources in that zone. If you’re looking to decommission a zone to determine if anybody is still needing information that exists in that zone. This Debugging Logging tab is the best place to actually locate this information because it provides you that long list of information about which clients are requesting what information.

Response Rate Limiting
DNS clients and DNS servers are configured in such a way that when a DNS client requests an address it will put the result that it gets back from a DNS server in its cache for the time to live period of the record. Maybe it gets reverted, maybe that cache gets flushed so maybe it might need to request the same record again but what a DNS client shouldn’t be doing is it shouldn’t be repeatedly asking for the same record in a very short period of time.So what response rate limiting or RRL does is, it allows you to configure how a DNS server will respond in the event that a specific client or computers from a specifically defined subnet seem to be frequently requesting the same record over a short period of time. So how do you deal with that activity that it’s reasonable to assume is malicious? First thing you need to know is that response rate limiting, RRL is actually disabled by default on Windows Server 2016 DNS. So unless you turn it on, well your DNS server will respond to those queries that are likely to be malicious. What you do is you configure response rate limiting using the Set-DNSServerresponseratelimiting commandlet. So when you are using that commandlet, there’s a bunch of parameters that you can go and configure for it and each of the parameters basically determines one of the ways that your response rate limiting policy is going to work. Before explaining those parameters let’s run Get-DNSServerresponseratelimiting command and check the state.
After running that commnad we can see that the DNS server is configured with the mode set to disable which means that there is no response rate limiting policy in place.

ResponsesPerSec –> This is the maximum number of times a server will send the same response per second to clients on a defined subnet. The default is 5 (responses per sec is what triggers the policy)
ErrorPerSec –> is the maximum number of times a server will send error message per second. The default also being 5. Now this is important because when a DNS server is under denial of service attack, even if it is sending error responses, it’s basically using processor cycles to do so. So even if it’s sending error messages out, well it’s slowing it down, it’s stopping the server. It’s functioning as a denial of service attack so at a certain point of time during a denial of service attack, you want to stop responding to that sort of traffic
WindowInSec –> this is important because when you’re looking at that maximum number of times per second for responses per second and errors per sec, what happens is it actually just doesn’t look at one second. It takes a window and uses that to calculate what the average is. So the default window is 5 seconds. So to get that 5 per second over 5 seconds, means that there actually needs to be 25 responses sent but it might be 20 responses sent in the first second and then five responses sent in the next four seconds. So it’s not just five per sec and response rate limiting when you enforce the policy isn’t just triggered on a per second to second basis. Basically what it looks at, it looks at traffic over a certain period of time default being five seconds and then makes a decision based on that period of five seconds rather than on a per second basis.
IPv4PrefixLength / IPv6PrefixLength –> When I’m talking about setting up response rate limiting policies, one other thing you should do is you define it in terms of subnet and you say well if there’s a certain number of requests that come from this particular subnet, so you use the IPv4 and the IPv6 prefix lengths to define what a subnet is. The default is a 24 bit IPv4 subnet which is the old class C if you’re used to that terminology or a 56 bit subnet if you are looking at an IPv6 subnet. So what you’re assuming is you’re saying okay well if I get a lot of requests from this /24 subnet I’m going to assume that they’re malicious. You can define it as bigger or you can define it as smaller as necessary.
LeakRate –> allows you to configure the DNS server to respond even while it’s in response rate limiting mode. So the idea is that once responses per second get over a particular value in the window defined period for the subnet in question, what you can do is you can have a leak rate where you’re still providing responses assuming some of this traffic is legitimate. So the default leak rate is 3. That means that it will respond to one in every three queries when an rrl policy is in effect. You can actually configure it to 0 and say right, when we’ve got rrl in effect, no responses whatsoever. You can also have a value between 2 and 10. If you choose 10, that means that one in every 10 queries will get a response. If you choose a value of two, that means in every two queries will get a response.
TruncateRate –> is how often a truncated response will be sent to a client in a blocked subnet when rrl is in effect.
MaximumResponsesPerWindow –> the idea here is that you could be under such an amazingly heavy denial of service attack that even though you’re only sending one response in every three, you’re still sending a phenomenal amount of traffic back to those suspicious clients. So with maximum responses per window, what you can do is you can say well when rrl is in effect, I’m going to say that I will send a maximum of 1,024 and that’s the default responses within that five second window back to that client or you might say right I’ll send 100 or 10. The default is 1024 so you can see even when rrl is in effect, there is an ability for the DNS server and by default the DNS server will still send responses back to those clients. You can choose to be far more strict with it and say I’m not talking to you at all or you can be like okay I’m going to answer one out of every couple of queries.
Mode –> is whether or not you’ve got those policies in effect and you can have enable, disable which is the default and logOnly. LogOnly basically means that you’re going to get log data about what would happen when you’re under a denial of service attack and so you’re under a denial of service attack and you’re getting a lot of log data about what your response could be and you might use that in a testing scenario. Enable means that policy’s coming to effect, disable is the default means the policies aren’t in effect.
Let’s turn response rate limiting on by running Set-DNSServerResponseRateLimiting -Mode Enable

We can also change those default setting. Let’s change for example leak rate. I will change it to 5. So what setting the leak rate to 5 will do is that it means that the DNS server will respond to one out of every 5 queries on the subnet that is subject to response rate limiting

Set-DNSServerResponseRateLimiting -MaximumResponsesPerWindow i will change it to 512. So I’ve changed that from 1024 to 512. That means that when response rate limiting is in effect over a 5 second period, the DNS server will send a maximum of 512 responses to the RRL applied subnet.
Let’s run Get-DNSServerresponseratelimiting command again to see if those changes are in effect and if the mode is enabled.

Response Rate Limiting Exceptions
Now with response rate limiting when you turn the policies on, you do actually have the ability to configure exceptions to the response rate limiting policies and you can do this on the basis of network interface or on the basis of subnet. So the idea being if you’ve got a DNS server that’s basically exposed to the perimeter network and to your internal network, you might say okay I am fine with an insane amount of traffic coming from my internal network because I’m kind of hoping that that’s a legitimate but if there’s an insane amount of traffic coming from somewhere on the internet, then I am going to put rrl policies into effect. So what you do is either say right I’m going to define my internal networks on the basis of subnet information or I’m just going to do it based on network interface on the DNS server and you can figure this using Add-DnsServerResponseRateLimitingExceptionList commandlet. Let’s check if there are any exceptions with Get-DnsServerResponseRateLimitingExceptionList
Now at the moment there are no subnets that are being excepted.

I’m going to configure a subnet so that it is exempt from response rate limiting policies. I’m going to call this subnet My Network and I’m going to define the subnet on the basis of server interface and I’m saying if the server interface is 192.168.0.20 then any queries coming from there are going to be exempt from response rate limiting policies and to do that I need to run Add-DnsServerResponseRateLimitingExceptionlist -Name “My Network” -ServerInterfaceIP “EQ,192.168.0.20”
If I run Get-DnsServerResponseRateLimitingExceptionList I can see now that if any queries are coming in from 192.168.0.20 that will be defined as the My Network.

Selective Recursion Control & DNS Query Filtering
- Selective Recursion Control
So what selective recursion control allows you to do is, it allows you to say I’m going to allow this DNS server to resolve recursive queries for a specifically defined set of clients but for most clients on the internet, no I’m going to ignore recursive queries. So that allows you to use a DNS server for clients on your internal network and say hey, use this DNS server and it’s going to resolve all of your DNS traffic but if these servers being contacted by someone on the internet and it might be another one of these servers that’s connected to the perimeter network and your internal network. No I’m sorry I will not resolve queries for you recursively. So that’s another way of sort of avoiding those amplification or those denial of service attacks.
- Query Filtering
Let’s see how this works.
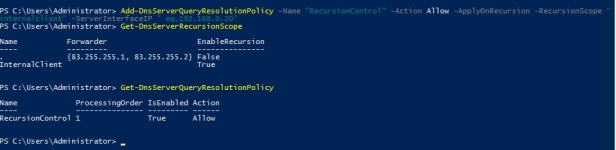
You manage selective recursion control using Set-DNSServerRecursionScope, Add-DNSServerRecursionScope, and then Add-DNSServerQueryResolutionPolicy. So basically you set up the recursion scopes, you say right for the default scope, I’m not going to enable recursion but for a very specific internal scope of IP addresses, I will allow this DNS server to actually resolve recursive queries.
Let’s see if recursion is enabled. Open powershell and run Get-DnsServerRecursionScope and we can see that the recursion is enabled for the default recursion scope which is named . (dot)

So what I’m going to do is I’m going to configure this server to not handle recursion by default and I’m going to configure an exception to that where I’m going to allow it to perform recursion for a specific set of IP addresses.
First thing what I am going to do is, I am going to disable recursion for the default scope . (dot)
Set-DnsServerRecursionScope -Name . -EnableRecursion $false

Next step is to configure exception.
Add-DNSServerRecursionScope -Name “Internal Network” -EnableRecursion $True

Now I’ve configured a recursion scope but what I need to do is I need to add a DNS server query resolution policy with a name for recursion control. The action will be allow, the apply on recursion flag is there for recursion specifically. Then the recursion scope is going to be internal client which is the one I’ve just created and the server interface is going to be 192.168.0.20 which is my internal network interface. So what that commandlet has done is enabling recursion for queries that are coming in through 192.168.0.20 but if a query’s coming in from anywhere else, recursion is disabled. So pretend that this server’s sitting on the perimeter network and on the internal network. If a query’s coming in from the perimeter network, recursion’s not going to happen. If a query’s coming in from the internal network, the server will resolve the recursive query.
Add-DnsServerQueryResolutionPolicy -Name “RecursionControl” -Action Allow -ApplyOnRecursion -RecursionScope “internalclient” -ServerInterfaceIP ” eq,192.168.0.20″
DNS Performance Tuning
Now it may be that you want your DNS server to perform at a very high level. Now out of the box, Windows Server DNS will handle pretty much the vast majority of traffic that it’s used for. And for most organizations there may be a couple of hundred or maybe a couple of thousand queries per second and if you’re just dealing with that, you’re fine. It’s really if you’re looking at the tens of thousands or hundreds of thousands of queries per second that you start to think about your DNS server performance tuning so there’s a couple of bits of advice that Microsoft has in terms of performance tuning DNS server. The first is that you disable recursion.Another good hint in terms of performance tuning your DNS server and you can apply this without really there being any impact on anything else is to create an explicit firewall rule that allows UDP traffic on port 53 for the interface IP address that is accepting DNS server query. Doing this will reduce the firewalls CPU usage. Because the default rule isn’t as explicit as UDP port 53. It basically does allow in TCP port traffic. But if you come in and create a special firewall rule, traffic’s going to be dropped at the firewall and that’s going to reduce your CPU utilization on your DNS server.
In the event that you have a DNS server that has more than 12 processor cores you should set the UDP thread count to eight and you can do this by modifying the registry HKLM\System\CurrentControlSet\ Services\DNS\Parameters\UdpRecvTreadCount registry key. So modify that registry key and set it to eight. As that will be the optimum level the UDP threads when you’ve got more than 12 cores. If you got less than 12 cores, leave it at the default.
The other bit of advice that Microsoft has for DNS server performance tuning is to configure network adapter buffers to maximum. And you can do this using the Set-Network Adapter Advanced Property- ,PowerShell Commandlet where you specify the name of your network interface, the Display Name as Receive Buffers and the Display Value as Maximum. That sets you Receive Buffers to Maximum which is advised if you want to have you DNS Server performing as well as possible.
No comments:
Post a Comment