How to install and configure File Server Resource Manager (FSRM) – Part2
 – Part2")
In Part 2 we will continue with our FSRM configuration. We will discuss about Storage Reports Management, Classifications, File Management Tasks and file server resource manager options.
What this part covers
- Storage Reports Management
- Classification Management
- File Management Tasks
Storage Reports Management

Now, similar to how we’ve been configuring all these different objects that fold into other objects for quota and file screening management, it’s here where we can also define storage reports management, or essentially how we can configure the storage reports that we’re interested in.
If we right-click on Storage Reports Management we can see that we can configure a report to occur on a scheduled basis. We can add or remove a report for a later report task, one that would be associated with, for example, a quota that gets exceeded or a file screen that’s tripped, or we could generate new reports based off of the ones that we have now.

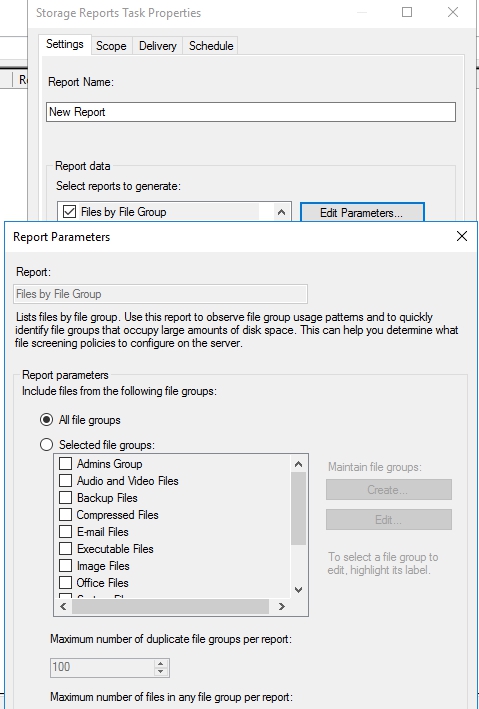
Let’s click on Schedule a new report task.

Here, we can configure the report name, so I will type in New Report, Under the Report Data we can identify the different reports that we should generate. Now, this is a pretty standard list of reports that are available, so duplicate files, by file group, files by owner, and so on. For each of these, you’ll find that there are parameters that are associated with them that will help you determine exactly what you want to see in the report.
Click for example on Duplicated Files and click on Edit Parameters
For the most part, the reports themselves are fairly static, and that you’ll find yourself creating more reports. But it’s the parameters here that will help you further tailor these down to something that is important to you.

Each different report has a different set of parameters that you may want to consider. So, in this case for File Screening Audit, the minimum number of days since the event occurred, which file screening events, whether it’s for all users or certain users.

Down here, files by file group changes it to the specific file groups you’re interested in. So, configuring these is important as you define exactly what storage reports you want whenever you kick this think off in a scheduled basis.
Now, once we configure what the settings should be for the report we’re interested in viewing, we then need to define what the scope will be, so what kinds of files are we interested in? These could be application files, backup and archival files, group files and user files. And then sub to those categories, you can then identify the folders that should be included there in the scope. So if I’m interested in for example user group files that correspond with that C:\Screens shared location, this would give me information that exists in the share.

Once we define the scope, then in the delivery tab we identify where we want to send the reports to. So do we want to send the reports to the following administrators? Also, where do we want the reports to be saved to? I will show later where you can change this and save report somewhere else.

And then, lastly, for the schedule tab, here’s where we configure when we want to run this report. So for example every day at 03.00 in the morning, go ahead and inventory the server and provide me with the report on all the things that I’m interested in.

When you click Ok it will shoow up in the window.

Server Options
Now, for these storage reports, I do want to identify, (under the root of SFRM –> right-Click on File Server Resource Manager and select Configure Options) that there are a couple of items here we should take a look at

Storage Reports
The first of which is just the default parameters for the reports that you’re configuring. Now, I showed you that for each of the reports, there are some parameters you can set that are specific to that report. But you can set here some default ones that exist across all reports. You could also review reports and set also a maximum number of files to include in those storage reports as well. Now, setting this maximum number of files can be handy so that you don’t find your server chewing away the CPU, trying to find every single file and folder in that path.

Report Locations
Here is where we can define where those report locations should go. Before, I showed you that generating a report would automatically drop it in that location. Well, this is the place where we can define what that location will be.

Classification Management

Now being able to classify documents manually is awesome in a world where users would actually properly classify their documents, but you know as well as I do that getting users to accomplish any of these tasks is probably something that you’re just really not going to do. And so for that reason, the manual classification of documents, although is a great idea, is something that most of us are probably going to try to have in our world as something that the users could possibly accomplish. And we will in the background be able to automatically adjust these classifications if we find the wrong kinds of data or key very important data that exists inside the document. Now the way in which we can accomplish that happens with the Classification Management. It’s here where we are going to perform a variety of file management tasks that have to do with changing the classification on those files that have sensitive information inside them.
Let’s see how this works.
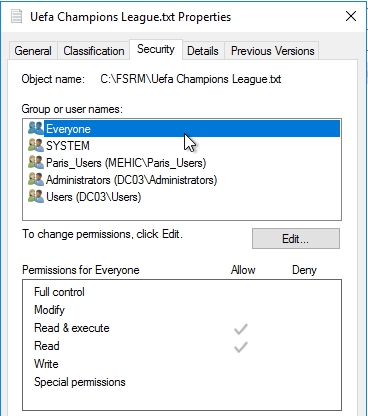
I have a document in C:\FSRM called Uefa Champions League. So maybe this is something I’m really concerned about that other people might read. And if you scope this out so that we are in a really large organization and maybe I’ve got thousands of files in here that have really confidential information that I don’t want people to be able to read, maybe I want to be able to figure out a way automatically hide that stuff.

I don’t want to open up every document and see if it has anything confidential. It’s just not feasible. But I can scan against a key word. In this case, it might be the word “confidential,” if I put a header confidential or let’s just scan against, for example, the word “Dortmund.” (I am a big fan of Borussia Dortmund).
If I check permissions of this file I can see that everyone has the access to it and I really don’t want to share that with just everyone. (I will show you how to replace permissions in File Management Task) So I want to change the permissions for this automatically any time a file is dropped into this folder or on a scheduled basis, or I could run it manually. So the way I’m going to do that is to run my file classification.
I will write about File Management Task later but you can run a script and remove those permissions so that everyone can’t access that file. You will configure this task after you configure classification.

Let’s go to FSRM Console. There we will find 2 options Classification Properties and Classification Rules.

Now, the reality is you cannot proceed any further until you create at least one classification property of your own. Right-Click on Classification Properties and select Create Local Property

Give it a name and description and choose Property type Yes/No. One done click ok

Here we can see our new property

Next step is to go down and create a rule. These Classification Rules are what we use to actually determine what kinds of content we’re looking for inside the files.
Right-Click on Classification Rules and select Create Classification Rule

General Tab –> Give it a name and description

Scope Tab — > Here you can choose things such as application files or user files and so on and we will scope this to, for example, User Files, Once we’ve done that, we can choose also to identify folders or subfolders that are going to be included in with the scope of this rule. Now we want to make sure that we use the scope or scope the rule down to just the folders that we’re interested in. As you can imagine, if we tried to scope this to the entirety of the folders on this server, it’s just going to increase the amount of work that the server has to do to look in each file to try to find this content we’re looking for.

Classification Tab – Once we’ve configured what the scope will be, we can come here to the Classification tab and determine what method we would use for actually identifying what the classification should be.
We can choose a Folder Classifier here, which would look at the folders themselves. We can choose a Windows PowerShell Classifier, which would give us the ability to write our own PowerShell script for searching through folders or looking at content. Now these are all useful for us, but for the purposes of this objective, we want to take a look at the Content Classifier here because if this Content Classifier that allows us to look into the files to actually figure out whether or not that bad content exists in the files.
Now for that Content Classifier, we need to identify which property we want to assign and in this case it is Dortmund. The neat part about this Content Classifier is that when we configure a Content Classifier, we have the ability to search for particular strings or regular expression patterns in files so to do that click on Configure

We will be creating a String that represents a Dortmund. If you choose case-sensitive and searching for yes against the uppercase Dortmund, if you have documents with lowercase dortmund it will not get a hit here, and nothing will proceed in the classification that I’m trying to do. We can also choose a File name pattern that we’re going to further limit our searches to. So, for example, if you’re only going to limit your searches to .DOCX files, you could set here the File name pattern to again just tailor this thing down to just the kinds of files that you want to search on.
Once done, hit ok

Evaluation Type Tab –> On the Evaluation Type tab, select Re-evaluate existing properties values and select the Overwrite the existing values and check both the Clear Automatically Classified Properties and Clear User Classified Properties. Then click OK

Our next step in this process is to actually go about configuring the schedule for how often we’re going to go analyze the file server to see if this series of digits actually exists. We can accomplish that by creating what is called a Classification Schedule. Right-Click on Classification Rules and select Configure Classification Schedule

Now this classification schedule, as you can see here is part of the variety of options that are tied to FSRM itself. This Automatic Classification, it determines when do we want our file server to go about checking all the different files and looking inside those files to see if that content that follows, that matches the rule we just created, actually exists. I might run this, for example, at some period early in the morning, like 04:00 in the morning to keep it away from the time period where the users may be actually attached to this server. I can set it up to run weekly or monthly, I can limit how long it’s going to run, I can allow continuous classification any time new files are being created, and then I’ve got a variety of log report options that I can select down here at the bottom.

When I hit OK, this will set up the schedule to occur every Sunday at 04:00 in the morning.
Now if I want to accelerate things, just so I can see if this process works correctly, I can actually run the classification in the foreground (Right-Click on Classification Rules and select Run Classification With All Rules Now) to wait for that whole classification to complete.


If I’m pointing this against a very large file share, this could take a really long time to occur, but thankfully I’ve only got a couple of files in there that I have to worry about. This will go ahead and run the classification and then give me a little report on what it finds. The following screenshot show the files that were classified as containing possible Dortmund word. It also Identifies the Classification Rule that was used to Classify the document.

If we right-click on the Uefa Champions League file we will see on Classification Tab that file has been automatically reconfigured

If I check another file in that folder the value will be none coz there is no word Dortmund in it.

File Management Task
Now, so far, everything we’ve talked about (mean on Quota and Screens) has to do with either preventing users from doing something, so preventing them from adding past a certain point or adding specific types of files, also reporting then on the things that you see on your file server. But sometimes it can become useful to actually perform actions based off of the presence of a file on a file server. And it’s here where we can make use of these file management tasks. Now, for the most part, these file management tasks have a very limited number of uses. They’re designed mostly for defining expiration on files, so after a certain number of days of inactivity, go ahead and expire the file to some archival location. It is also used for classification management.We can use file management tasks to either: A, run a script, or B, expire the file. And in this case, what I mean by “expire the file” is effectively that, to actually take the file, now that it is no longer being used, and then just simply transfer it into some other location for archival purposes.
So let’s create new file management task. Right-Click on File Management Tasks and select Create File Management Task

General Tab – Give your task a name and description, In my case it will be Archive Files

Scope Tab – Now we can define the scope, Let’s say group and user files, in that same location on the C drive

Action – So, here, under file expiration, we have the option of choosing what an expiration directory should be. So maybe after a certain point, under C:\, we should create a new folder called Expired Files, that will end up transferring these files into. So for, again, for archival purposes. We could, alternatively, do a custom script (like I did in Classification part – here you should choose custom and run script which will remove permissions from the files), or with Rights Managements Services, we could encrypt the file based off of any of the characteristics that we define here in this file management task.
I will select File Expiration and choose Expired Files for archival purposes

Notification Tab – We can then set up notification, so what sort of notification do we want to occur any time a file gets deemed as expired and moved into that other location?

Report – Do we want to generate a report? And where do we want to send it?

Condition – Are there any conditions associated with that file? So for that file, are there any properties or other operators that are associated with the file? These have most to do with the classification management. So the first window is for classification management. What we can, however, do is down here at the bottom, define for expiry, things like when that file was last created or modified or accessed, and also any file name patterns as well. So let’s say, for example, that any time a file has not been accessed for a period of 60 days, let’s go ahead then and expire the file and move it off into our archival location to just simply get it out of our file server. We can do that here by setting this condition.

Schedule Tab – we can define when we actually want to go through and run this scan. So, generally, you typically do this in the middle of the night, just like all your major management tasks. So 3 a.m., for example, being a location or time that we would accomplish that, and then perhaps weekly, every Thursday, for example. Or you could alternatively run that continuously on new files. This is most commonly done when I’m classifying files, as part of classification management. But this gives you the ability to create a file management task, in our case here, just simply automatically expire those files when they’re no longer relevant for our users.


You can wait until that day or you can manually run the task by right-clicking on task and selecting Run File Management Task Now

That’s it.
Now I promise that I will create a Task for classification and remove those permissions so that for example everyone group don’t have access to that file or any other file with that property.
So what I did is a new task Restrict Champions League Files

Action Tab – Change Type to Custom and add your script. With that batch file I’m going to turn off inheritance. The next thing I do is I use the same command against the same file. I want to remove everyone group
Condition Tab – add property.

Schedule Tab — be sure to mark Run Continuously on new file —- that’s kind of handy because that will, especially for security sensitive documents, make sure that as soon as the file gets dropped in there, the appropriate security gets run up against it.

Run the task by right-clicking on task and selecting Run File Management Task Now. Now if I go to that location and right-click on that file we can see on the Security tab, everyone is gone. And you can see by the darker check marks that I’ve also removed inheritance there.

What we covered.
- Configure storage reports
- Classification Management
- Configure file management tasks
No comments:
Post a Comment