Windows
Deployment Services(WDS) is the key of deploying automated-based
installations of standard or custom images to servers in a network. WDS
server store the installation files and help you to manage the boot and
operating system files used in the network installations. Like capturing
image firstly, then deploying them on client computers with all drivers
and applications you need for your network. Update operating system,
drivers and applications then take an image of the template computer.
The computer you take capture image from is called template computer.
Sysprep is the tool that you can image through from a template computer
and store the image on WDS server to deploy on WDS clients.
WDS
makes your life easy. You don’t need to move from one room to another
room deploying operating system with needed softwares and drivers.
Administrators can make schedule for deployment. Next day when you come
and login to your computer, you see the new operating system installed.
In addition, drivers and softwares have been installed.These are some other methods of deploying operating system on client computers:
- DVD: You can go to computers one by one with a shiny disk in hand and install operating system on. For an enterprise network you need lots of disks and it takes a long time. This method can be implemented on
- Bootable Flash memory: You can install operating system using bootable flash memory. When the flash memory is bootable, you copy all operating system files in, and plug the flash to computers. For the process you need lots of flash memories.
Topics covered in this post:
- WDS Advantages
- WDS Images
- Hardware Requirements
- Prerequisites
- Install WDS role Graphically
- Installation WDS role through PowerShell
- WDS Basic Configuration
- Add Install Image
- Add Boot Image
- Conclusion
WDS Advantages:
- Install Windows 7, 8, 8.1 or 10 remotely.
- You can install Windows with needed softwares and drivers simultaneously.
- Install Windows on large number of computers at one time.
WDS Images
WDS uses four image: Install image, Boot image, Discover image and Capture image. The minimum of requirement is boot and install images.- Install Image: It is the actual operating system. It is found in the operating system media\sources\install.wim.
- Boot Image: It is Windows PE image. You can find it the operating system media\sources\boot.wim.
- Discover Image: This image is used by WDS clients which don’t support PXE boot. You create the image using boot.wim image from media file and Windows Assessment Tool Kit (ADK) to create a discover image.
- Capture Image: This image is custom install image. You capture the image from a template computer using Sysprep, and deploy the image on client computes.
Hardware Requirements
- RAM: minimum of 2GB
- Processor: 64-bit processor
- Hard Drive Space: At least 6GB
Prerequisites
- AD DS: The deployment server must be either member server (joined to a domain) or a domain controller.
- DNS: An active DNS (Domain Name Services) is required for Preboot eXecution Environment (PXE).
- DHCP: It is needed for supporting PXE boot.
- NTFS volume: The volume which contains images must be NTFS format.
- Credentials: Make sure that you have logged on with an account that have permissions to do this tasks.
Install Graphically
Undoubtedly the easiest way of installing a role is graphical interface.1. First of all press the Start Menu button. Then select the Server Manager.

Start Menu

Server Manager

Select Destination Server

WDS Role
- Deployment Server: It is the deployment server with management tools.
- Transport Server: It is WDS core service, but doesn’t include management tools. You need to use scripts for every task that you want to do. Therefor you need to select both of them.
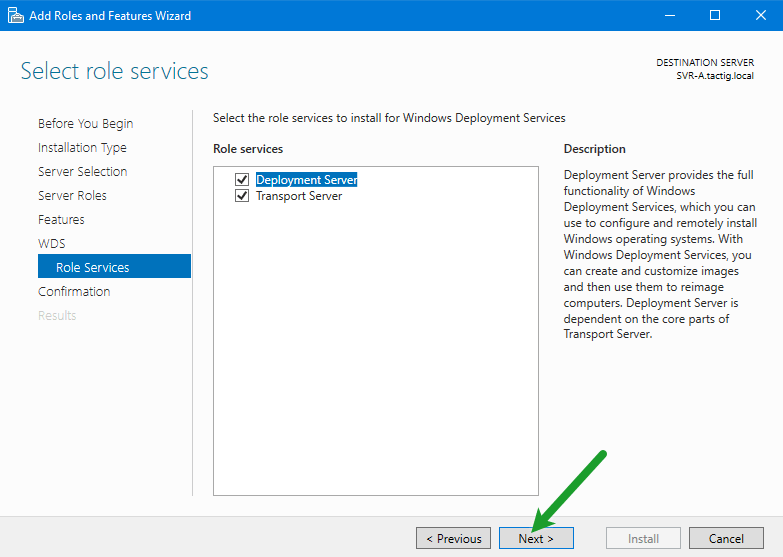
Select Role Services

Confirm Installation Selections
Installation through PowerShell
PowerShell is a powerful tool in Windows Server 2016. You need to know how to use it.1. Press Windows button and select Windows PowerShell. Make sure you run PowerShell as an administrator. Right-click on and click Run as administrator. Also you can run PowerShell as an administrator with command. Open PowerShell as standard user and type this command to run it as an administrator: Start-Processs PowerShell.exe -Verb RunAS. Then press the Enter button.

Server Manager
After -ComputerName parameter, type your server’s name. In my case it is SVR-A. Then press the Enter button. While WDS installed successfully on your server, the summary would be shown to you. Saying that role installed successfully and no reboot is needed.
The -IncludeMnagementTools parameter installs the management tools. If you don’t type the parameter you won’t have the management tools. It means you just have installed the core services.

Install WDS Role
WDS Basic Configuration
Finally role was installed. We need to configure WDS server and use it across the network.1. In Server Manger console, in the menu bar, click on the Tools. Then click on Windows Deployment Service. In addition, you can open it through Run. In the Run just type wdsmgmt.msc and press Enter button.

Windows Deployment Services

Configure WDS

Integrated With Active Directory

Remote Installation Folder Location

Proxy DHCP Server

PXE Server

Task Progress

Start WDS Server
Add Install Image
1. Before you add install image, create some groups for different operating system install images. Before you add an install image, you need to an image group. You can easily manage your image in groups. Right-click on Install image. Click on Add Image group. A small windows opens, type name of the group inside and click on Ok button.
Add Install Image Group

Add Install Image

Image File Location

Available Images

Finish Install Image Wizard

Install Image
Add Boot Image
1. Right-click on Boot Images and click on Add Boot Image.
Add Boot Image

Boot Image Folder Location

Image Metadata

Finish Boot Image Wizard

Boot Image
No comments:
Post a Comment