How to install and configure Distributed File System (DFS) 2016 – Part 1
 2016 – Part 1")
DFS stands for Distributed File System, and it provides the ability to consolidate multiple shares on different servers into a common namespace. Whether or not there are multiple locations providing easy access to that data is something that we and IT are charged with. If we can provide easy access, one that consolidates the different locations where data can exist under a single store in a single path, that makes things a lot easier for our users, which in turn makes it easier for us as admins. It is attempting to resolve both of these situations that is the reason why DFS exist and indeed has existed for a number of OS versions.
Let’s take a look at on example where DFS is useful. I am talking here about standalone DFS namespace and not the domain DFS namespace. I will talk about differences so that you know what to choose. Imagine you have the following share setup in your organization. What is “wrong” with the left side?

Well, imagine you were to move the software data or any other share to a new file server. You’re going to have to update all the user drive mappings to redirect them to the new server share. Now this might be a simple case of updating a logon script, but what about all those users that have mapped it manually. You’re going to have to let them know that you’ve made this change and then you’ll have to go through the process of fixing it, and explain to them why this IT change broke their share access. If you take a look at the right side, DFS will allow us to simplify this by presenting a common namespace to the users, whilst in the background transparently redirecting them to the various share locations. So we can update these locations in the background without affecting the UNC path. So for a standalone DFS namespace it would look something like this. We would have the server name (DFS01), we would have the DFS namespace name(Shared Files), and then we would have subfolders representing project Organization, Home, UserFiles, and Software, etc. So now we’ve got a single drive mapping, in this case S, which is mapping to all these shares in the background, and as I say, if you wanted to redirect or move those shares, then you can do that using the DFS namespace without having to go through and update all the user client drive mappings.
Now, if we were doing this using a Domain DFS namespace, then instead of using the server, DFS01, as as the server name, you actually use the Active Directory domain name, and like before, the user will see the shares presented as subfolders.
STANDALONE VS DOMAIN NAMSPACE
Tthe key difference is the referral server and where the DFS information is stored. On a standalone DFS implementation, the referral information is stored locally on the single DFS referral server that you choose when you configured DFS. Now this type of configuration is useful if you don’t have an Active Directory domain or if for some reason you don’t want to integrate with Active Directory, but the downside is that you can only have a single referral server, and if that server is offline then you’re not going to be able to access the DFS namespace. The more common and generally preferred approach is to use Domain DFS. In Domain DFS you can have multiple DFS namespace referral servers, perhaps spread out amongst your core sites, and we use Active Directory to direct the clients to the closest referral server.DFS Replication
DFSR is the component of DFS that allows you to duplicate the DFS data and replicate copies of that data across multiple locations. DFSR enables you to take file data and keep the data synchronized across two or more locations, and that’s an important differentiation from BranchCache as BranchCache maintains a single master copy with only a local read-only cache. When you have multiple copies of the same data, there are inherent risks from people updating that data in multiple locations at the same time. Therefore, before setting up DFSR, ask yourself, will people, or maybe processes, be likely to be updating the files simultaneously in multiple locations? If this is expected to happen a lot, then DFSR may cause you issues and you may want to consider using BranchCache or perhaps just keeping a single copy of the data.DFSR is very powerful, and it enables you to create really any type of replication topology that you can think of, and a useful feature of any replication mechanism is the ability to schedule and throttle the replication. If your WAN link is constrained, then you can protect it by only enabling replication in the evenings. Anytime you’re going about replicating content from two different locations, there’s always the chance that those two locations could get manipulated or changed at the same time. And so, for that reason, it can be important for us to configure staging or essentially a temporary location where data goes before it ends up replication from one site to the other. And finally, it also supports remote differential compression. This enables it to officially replicate only the changes to files, and not have to replicate the whole file itself when perhaps only a few bytes of data has changed. We will see how this works a little bit later.
DFSR Topologies
- One – to – One Replication –> This is where data is synchronized between two servers. This is an easy to understand topology, and relatively easy to troubleshoot, and it’s good if you have two main locations dispersed over a WAN link.
- One – to – Many Replication –> This is useful if you have a main central site and you want your branch sites to have local copies of the data. A great use case for this could be a software distribution share or maybe you have read-only reference information that you want to make available to your branch users. It’s worth highlighting that the shares on DFS within your branch sites or even your central site, can be made read-only, and the standard NTFS file permissions apply.
- Many – to – One Replication –> This, as the name suggests, is where multiple sites all replicate their data into a central location. So where might this be used? Well, it could be used for backup, where you have all the data replicated from your branch site, replicated into a single central site, and we have the backup software running on that central site.
- Hub – Spoke Replication –> this is similar to many-to-one replication, however, it’s bidirectional. This means that there would be two replication hubs between the branch sites because the branch sites would need to send data to the central site, and then the central site would replicate it out to the other branch sites.
- Full Mesh –> full mesh is where any server can potentially replicate with any other server. Now this can speed up the replication of changes, as there is a direct connection between sites, but it can also cause excessive replication, and it can also be very complicated to troubleshoot.
So, as you can see, you can configure replication pretty much as you wish, and as a rule of thumb I’d recommend aligning your replication topology to match your underlying physical network topology. So if all your branch sites connect via the central hub site, then the hub-spoke replication topology might make sense. However, like most design decisions, always strive to keep things as simple as possible, and always be able to justify why you’ve configured something in a particular way.
INSTALL AND CONFIGURE DFS NAMESPACE (STANDALONE)
The first thing we’re going to do is configure a standalone DFS namespace. A standalone DFS namespace is useful when you don’t want to integrate with Active Directory, but you want to store the DFS information locally.The first thing we need to do is install the DFS namespace’s role within Windows

Once done click on Tools –> DFS Management

DFS Management Console will open and we can see both halves of DFS (Namespaces and Replication) We will talk about replication later.

For the first step in this process, let’s actually go through for the configuration of a namespace, which will point to our share location that we wanna make available. To create a new Namespace, right-click on Namespaces and select New Namespace

Now we need to select or tell DFS what server is going to be the Namespace Server. In my case that will be DFS. Click Next
(IF YOU NOTICE THAT YOU ARE NOT ABLE TO USE BROWSE IN WINDOWS SERVER 2016 DFS, UNINSTALL KB3186568 AND REBOOT THE SERVER.
The issue is connected to update Microsoft .NET Framework 4.7 (KB3186539 for 2012R2 and KB3186568 for 2016 and Win10)

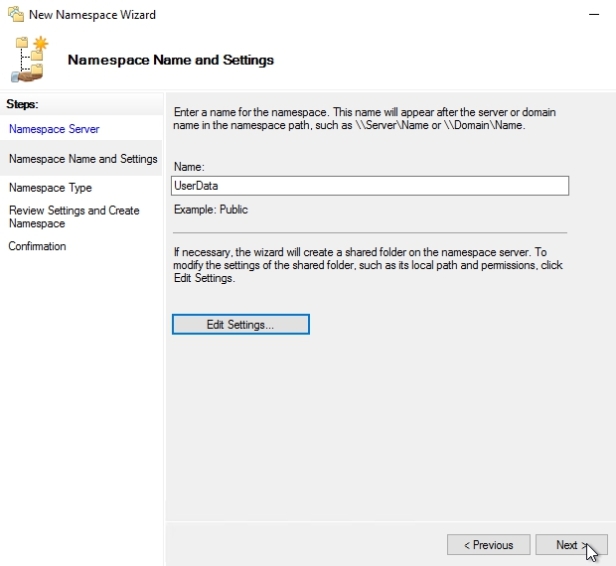
Now we need to create a name for the namespace that we’re interested in. Now, this name for the namespace does not necessarily need to be the same thing as the share name. Instead, what we wanna create is a location that users can go to where subfolders of which, at least from their perspective will be the variety of different folders or shares that already exist. You can call it everything, or software or Shared Documents etc, I will call mine Data
Now, just like any old share, we also need to configure the permissions on that share as well as the location as to where it goes. Click on Edit Settings

Here you can change the permission of the share folder according to your requirements. Remember, this is not yet the company shared location. We’ll plug that in after we configure this DFS route. Our local path currently is C:\DFSRoots\Data and then you can also configure some permissions on this shared folder as well. will leave the defaults and click OK and next

Now we have important distinction here because on one hand, you have what’s called a domain-based namespace where the namespace in pathing itself exists in Active Directory. On the other side, you have what’s called a standalone namespace, which correspond to the file server on which we’ve installed DFS. Now, in the case of a standalone namespace, you’re effectively creating a share just like you would a traditional share that collects and aggregates all the links of the share folders. Short of hosting this share on top of a fail over cluster, as you can see down in the description, this doesn’t provide you any height availability for the share. Now, this stands in contrast with the domain based namespace where when the namespace itself exists in Active Directory, any Active Directory domain controller can point that user to the correct location as long as you just have an Active Directory in place for them to reference against. Now, the biggest difference here is the idea that with the domain based namespace, you’re actually referring to the name of the domain itself as the source location for that share. So here we’re doing \mehic.se\data is the root for the namespace we’re creating. This is different from down in the bottom where again, it’s just the file server itself.
We will first create a standalone namespace so that you see how it looks like and then we will create domain-based namespace. Click Stand-alone namespace and click next and Create


Now we can see that the namespace has been created. So the first part of the namespace, because it’s a standalone one, is the DFS name that we selected, followed by the namespace name.

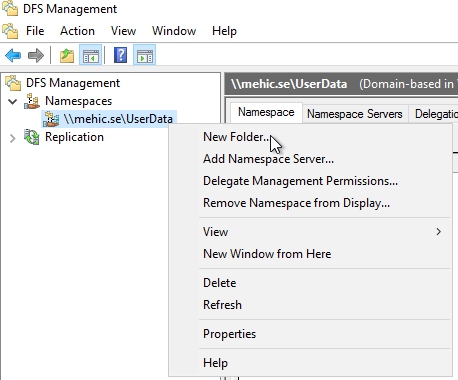
Now a namespace without any targets is not much use to anyone, so the next thing we need to do is create a referral target. We will create a new folder which becomes the first in that series of links that we want to aggregate under the namespace. Right click on the namespace and choose New Folder

I will call it UserFiles –> Click ADD –> Browse and then for the folder target, we will set up the path of the folder target on our server DFS and we’ll associate it with that shared UserFiles.
Click OK 2 times.


Now let’s just go add a couple more, but now I’m going to add a share or a folder path that is on a different server. Right-Click on the Namespace and select New Folder

I will call it IPAM Share 1 ( This is just a friendly name that the users are going to see under the Data path within the namespace so you can type in whatever you want).

So this is just to demonstrate that even though it’s a standalone namespace you can still point to Folder Targets, or folder shares, on different servers. The standalone namespace just means that the referral information is stored on one server.
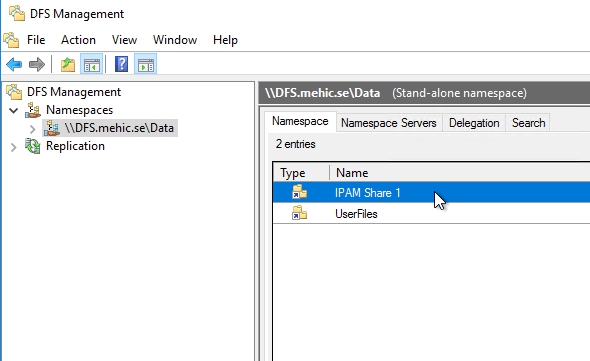
And you can see if I go to the Namespace again, you can see the IPAM path is present even though that’s on a different server.

INSTALL AND CONFIGURE DFS NAMESPACE (DOMAIN-BASED NAMESPACE)
This is very similar to what we do in the standalone namespace, but this time the information is going to be stored within Active Directory. I will use my servers FILESRV01 and FILESRV02 for this and for the DFSR part as well.I already installed DFS Namespace and DFS Replication role on both servers.

Open DFS Management Console and right click on Namespace and select new namaspace

This time server will be filesrv01, click next

Now we need to give it a name and this time I will call it UserData and I will leave the permissions as default, click next
This time we will select the option Domain-Based namespace. Enable Windows Server 2008 mode will give us support for scalability as a function of Active Directory and also, so you to be able to use access base enumeration. Be aware that if you should choose the non-server 2008 mode and you later need to enable it, the only way to do that is to actually remove and then recreate the namespace in order to turn on this extra functionality like access based enumeration. So unless you’ve got an old server, it’s best to select that. Click next and create

Now, the difference you’ll notice is that now the namespace path is actually \, my domain name, which is mehic.se\UserData, whereas on a standalone namespace it would have been \, and then the server name, so that’s the obvious difference between domain and standalone from a user’s perspective.
Let’s add some target folders to this. Right-Click on the namespace and select New Folder
Give it a name and browse to the shares. You will need to add the one by one.


CONFIGURE NAMESPACE REFERRAL SERVER
The referral servers are the servers that refer the DFS client requests for either a domain or a standalone DFS namespace, and redirects them to the target shares. Right now I have only one referral server and we can see that by clicking on DFS namespace –> Namespace Servers

However, we don’t have any backup servers, so if this server goes offline we’re going to lose our namespace. Just to point to be able to add second server you will need to have DFS Namespace role installed on that server. I will use my FILESRV02 for this. When that is done we can click on Add Namespace server in DFS Management Console –> Actions Pane –> Add Namespace server

Add your server and click on OK


You will notice in the middle it’s actually telling us what Active Directory site this server is in as well. DFS is Active Directory site aware, which basically means that if you have folder targets in different sites, then it’s going to try and allocate the client to the closest folder target based on the client site.
That’s it. Next part will focus on DFSR and how we can configure it. We will take a look at replication targets, scheduling, staging etc.
No comments:
Post a Comment