How to install and configure Distributed File System (DFS) 2016 – Part 2
 2016 – Part 2")
In the previous part we’ve seen how we can set up DFS, so now we’re going to take a look at how we can synchronize data between two or more DFS replicas.
ENABLE DFS REPLICATION ON REPLICA SERVER
The first thing we need to do is we need to enable the DFS replication role on each of the replicas. I already installed both DFS Namespaces and DFS Replication on all my servers.

On my Filesrv01 I created a new folder called Company Files and inside I have few pdf files.

I have another machine here called filesrv02 which I will use for DFS Replication. Filesrv02 is just another computer here in my Active Directory domain. It could be in a different Active Directory site if we wanted to configure it in that way but effectively, this is another machine in some other geographic location where users need to access that content in that Company Files location.
In order for us to create a replication relationship, we need to come to DFS management and create what is called a new replication group. Right-Click on Replication and select New Replication Group

and here we have two different kinds of replication groups we can create.
Multipurpose replication group -> The first of which is one that is used for most of the use cases that DFSR works with. In a multipurpose replication group, this is essentially two different machines or two or more machines that exists in a replication relationship. You can use this for sharing of resources so that people in both locations can access content and have that content replicated to the other side.
Replication group for data collection -> this is for a specific use case where you have a remote site computer, so some other file server way out in a remote site somewhere that you want to replicate the content one directionally back to your hub site or to your main office site for the purposes of backing it up. Now, this does not configurate the backup component of actually backing up this data. This is just replicating it from that remote site to the local site so that your other probably third party backup or Windows Server backup solution could then back it up to disk or tape.
Choose the first option and click next

For this replication group, let’s go ahead and configure this as the COMPANY FILES replication group. We can put in a description if we want. Once done click next

Now we need to put servers that are gonna participate so in my case that will be filesrv01 and filesrv02. As part of actually configuring these, it will go about verifying whether or not DFS has been installed on this two machines and also if the remote machine and the local machine can speak to each other. There’s no for example, firewalls getting in the way.
Click Next

On the Topology Selection part, here we need to identify what topology for the replication we are interested in. Now, in most situations, you’ll find yourself configuring what is called a full mesh topology. The idea being here that both halves of the replication are intended to be kind of peer-to-peer. So, a person may change something on filesrv02 or a person may change something on filesrv01 and that change needs to be replicated over to the other server.
In a situation where you have three or more machines where you have the need to disseminate information but not so much replicate the information back. You can choose what’s called a hub and spoke topology up here at the top. Again, as you can see in the description, it works well in publication scenarios where you just need to simply publish information out to different machines. Imagine for example, you had a series of web servers. All of which participated in some sort of cluster. Well, when those web servers need to get change, we could configure them in a hub and spoke configuration so that a single change to a file could then be automatically replicated out to each web server as part of this DFSR replication.
Click Next

Here we can configure the replication group schedule and bandwidth, which for now, I’m just gonna leave the default configurations. We’ll come back to this here later

I then need to configure what the primary member will be. In my case this is gonna be the member that contains the data, so filesrv01. On filesrv01, that’s just the initial copy of the data that has to get moved over to filesrv02. Click Next

Now we need to choose the folder to be replicated to another server. Click Add and add the folder. When we configure this on the remote servers, we can choose the same name, Company Files or I could configure a custom name and then down under the permissions, this is where I could either configure the permissions, so do I wanna set permissions in that remote location or do I wanna use the existing permissions that are already there? In many situations, it can be a good idea for you to configure the target folder and also the target folder permissions, share permissions, NTFS permissions first before you go about initiating the replication. You can go about configuring your custom permissions here but I’ve had generally in the past, a better experience with ensuring manually that those permissions and the folders have been configured in both locations first. I’ll choose OK and then choose next


As we can see here the Membership Status is Disabled which means no replication will occur. Click Edit

it’s here where I can identify what the local path should be. I need to choose to enable the membership status here. If I choose to disable it, I won’t do any replication at all and then I wanna configure the local path , which on that server will be the C:\ Company Files location.
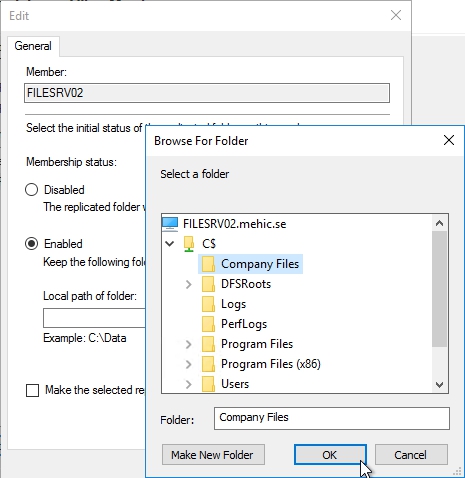
I could choose to make the replicated folder on this member read-only, which is the single way in which you can make this a one directional replication. In every case, DFS is a bidirectional replication unless you configure that remote location to be read-only. In our case, we want people to be able to access content and change content on both servers. We won’t actually configure it as being read-only. Click Next and Create

That will go about creating the replication group, creating the connections and then beginning the process of replicating this content for one server to another.

You’ll see in creating this, we get a little dialogue box up here that illustrates that our Active Directory replication can sometimes slow down the process of getting this replication kicked off. Click OK and close

So within the DFS Management console I’ll select the replication group we just created, and we can see under the Memberships tab it shows us which servers are members of this replication group

Under the Connections tab, it will show us all the Sending Members and the Receiving Members, and it also shows us the Active Directory sites those servers are in.

This process doesn’t take very long when you got a very small amount of data but as you can imagine, If I’ve got an extremely large amount of data, terabytes of data, this whole replication process could take a pretty extended period of time to get that initial replication complete.
Just to point here is that DFS replication is very powerful and whatever you do on one server is going to affect all the other servers within the replication group. So if you delete a file that file will be deleted on every server.
CONFIGURE FILE FILTERS
When we are done with Replication configuration we have option to configure another one important setting and that is file filter. Right click on folder and select Properties.

In File filter you can see default values the .bak,.tmp extension of files. This means that these types of Files will not be replicated. In case that you have these types of files you must remove it. You can use this filter to exclude any type of files you want to exclude from replication.

DFSR Replication Schedule
With our replication group, now, configure it, we’ve got a couple of other settings that we just wanna take a look at, the first of which has to do with the schedule for replication.
Let’s first open Replication Group Schedule by right-clicking on our group and selecting Edit Replication Group Schedule

When we configured this group, we configure the replication group’s schedule such that it would occur across all 24 hours across the dial, as well as all seven days of the week. It also has no constraints on the amount of bandwidth that’s being used in order to complete that replication but here under the edit schedule view is where based off of either the local time of the receiving member or off of UTC I could configure a schedule to either eliminate replication from happening or to dial down its available amount of bandwidth.

If you’ve got a very latent connection between two servers, you might wanna dial down this connection so that the replication traffic doesn’t prevent your users from doing anything else over that connection. Under details is where I can do some very specific detail for days of the week or hours of the day where I might just dial down the bandwidth just a bit. This gives you the ability to define the schedule for the entire replication configuration.

Now, in our world where we have two different machines, that also is the entirety of the replication schedule but in worldwide might have more than two like three or six or 100 different machines that are replicating to each other, this master schedule may be less helpful for me than some more specifics to the schedule or being able to dial it down by machine for each individual connection.
If we go back to our replication group and if we take a look at the different connections, so from one server to another server, it’s here where I can either determine whether or not that machine should use the default settings, (right-click on one server and select properties –> schedule tab) or whether I would create a custom connection schedule as well.

Now, in the world where I’ve only got two servers, this doesn’t make a lot of sense but if I do have those 100 machines, you might imagine that your different network settings between geographic locations may have different parameters. You might have a very fast network connection to one location then a very slow network connection to another. So, it’s here where you can configure that custom connection schedule for just between two or one pair of machines.

While we are here on the same property screen associated with the connection, I would like to talk about another interesting option called Use Remote Differential compression (RDC). RDC is a tool that facilitates compressing files before they end up getting transferred off to the other side of the replication connection and effectively, when you turn on RDC, you trade CPU power in exchange for the amount of power bandwidth required to get that file transferred across. If you’re finding yourself constrained by CPU, you may want to actually remove this checkbox if you’ve got plenty of bandwidth. Just to point that this RDC is not the same RDC that you would install as a Windows Server feature.

In order for a file to qualify for remote differential compression, that file has to be at least a certain size, which by default is greater than 64K. We can see those options if we open powershell and type in Get-DFSRConnection
Both the RdcEnabled and then the CrossFileRdcEnabled are enabled. Down at the bottom is where you can adjust the MinimumRdcFileSizeInKB. These three settings, you can reconfigure here using PowerShell with the Set-DfsrConnection cmdlet and that is cmdlet I would use to for example, disable RDC or to disable cross file RDC or more specifically, if I wanted to perhaps increase the minimum file size for the use of RDC, I could do so as well. Doing so would simply increase the file size, the minimum file size that’s necessary for RDC compression to be then be used before transferring it over the network.

CONFIGURE STAGING
Reducing the schedule or reducing the bandwidth of a replication connection can also have the effect of having two people perhaps make changes on a file before that file can be replicated and before one’s changes can be replicated to the other. Well, very large files also have a similar situation because just the amount of time required to get the file transferred from one location to the other can be longer than the amount of time between when the original file was changed and some other user attempts to make a change in the target location and so for that purpose, here with DFSR, there is also a staging location that’s created for files that exceed a certain size.If we take a look at either of the two servers that are participating in this replication connection, if I right click on one of them and choose properties

Staging Tab, at the location where this staging paths actually exist. Here in C:\Company Files, the DFS private location and staging is a separate folder where files are transferred to. These files are transferred to this location to be staged before their transfer to another location. The use of this staging folder enables us to have a bit of a queue for these changes to occur so they’re replicated to the other location, the target location without worrying about there being any modifications or changes by users during the process of a transfer. You can hear change to staging path. You can hear also a change what the quota would be for the file size to be used for staging.

Conflict and Deleted Folder
What happens when you make changes to the same file on different replica servers before they have time to replicate? Do they fail when replication stops, or does something else happen? Well, quite simply, if you make the changes to the same file at the same time, then the file that has the latest change, will be the one that’s get replicated around, and the other file will get moved to a special hidden folder under the target folder on the replica called Conflict and Deleted.
To be able to see files that are in Conflict and Deleted folder you will need to open powershell and browse to C:\<your share>dfsrprivate\conflictanddeleted you will be able to see conflicted files and also any deleted files stored if there was a conflic of course.
To be able to restore files from there you will need to copy them from the folder, example
copy ‘c:\<your share>dfsrprivate\conflictanddeleted\filename’ C:\
Configure Fault Tolerance
Now that we have replication configured and all the other settings set appropriately for these two servers in these two different locations, we can now go about making some changes to that DFSN link that we created. Let’s take a look at the DFS namespace we created under a mehic.se\UserData (CompanyFiles) and let’s see how to actually make this a fault tolerant link.
When we first configured this, we only had one copy of the data and so, that single copy of the data existed over here on our server filesrv01. We now have two copies of this data. So depending on where that user is, depending on which Active Directory site they may happen to be in. We can now configure a fault tolerant link to direct them to the alternative site if they’re existing in local DFSR server is no longer listening or functioning.
There are a couple of ways in which we could do that. One way in which you can accomplish this, is by right clicking and choosing to add an additional folder target onto the ones that have been configured here for this DFS namespace.

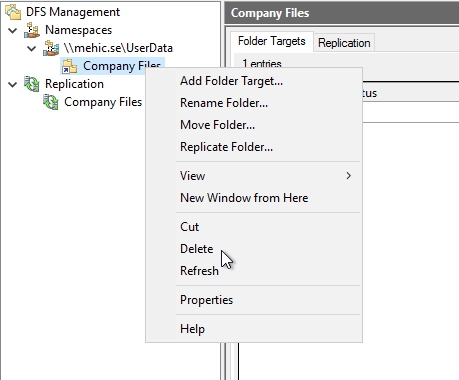
To show you another way, let’s first delete our Company Files folder. Right-Click on it and select Delete

With that now completed, I wanna come to the CompanyFiles replication group that we created before, you’ll notice over here under the replicated folders tab, we have the publication status for this replication group set to not publish.

we can right-click on our folder and use a nice little wizard to share this location and publish it in an existing namespace.

On, Share and Publish Replicated Folder Wizard, we’ll share and publish that replicated folder in the namespace, leave the defaults and click next

Here We’ll identify which of the two servers we’re interested in, and for either, we wanna identify that it’s an existing shared folder. So there’s really nothing new that we’re doing here. We’re just publishing the existing folder that we worked with before.
Click Next

Once we do that, we can identify which parent folder in the namespace we want to attach these two servers in the shares too. If I choose browse, then I can identify this mehic.se\UserData namespace that we created earlier and we’ll just give it the same folder name as before, CompanyFiles.
Click Next and Share

If I choose share, that goes about actually creating now this fault-tolerant namespace that occurs across both of these two different servers.


You can see that we get a little icon on the folder indicating that the stuff is being replicated.

What this allows me to do though is for users in whatever location is appropriate for them to point first to the server in their Active Directory site and then alternatively to point to the server in the other site if they can’t access the data in their own.
That configuration happens under DFSN where we can configure things both on the original route namespace and then on the folder that we attached. Right-Click on DFS Namespace and select Properties
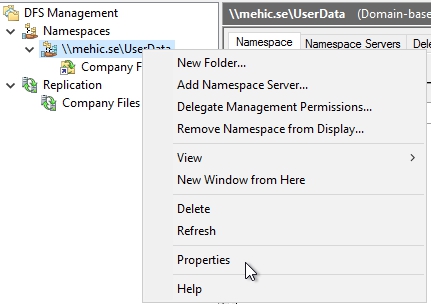
Click on the Referrals Tab, we can determine what the ordering method is gonna be for clients that cannot access the file server that happens to be in their Active Directory site. Let’s assume for example, that in this case, we had more than one Active Directory site that made up our domain. Maybe we had multiple different sites that correspond with a Paris, London and a Berlin geographic location. Well, the connection between those sites provides us a way to determine how we should actually redirect users to a different file server in a different site when they cannot access the file server that happens to be in the local site. Do we wanna use the server that has the lowest cost setting? This is an Active Directory cost setting. Should we choose a random order? And essentially, distribute the load out to different servers or should we actually exclude targets that happen to be outside the client site. So, if you can’t access your server in your site, well, you’re not allowed to then access any of the servers outside of that site. By default here, we’re gonna choose the lowest cost setting, which is again, an Active Directory sites and services setting.

Once I’ve configured these here for the root namespace, I will need to move then back to the folder and make some additional configurations again under the referrals tab. Right-Click on the folder and select Properties

Select Refferals Tab, and for each folder I can configure special configurations, like to exclude targets outside the client side or to fail back to preferred targets if I want to. This gives me a pretty discreet control over which folders users will be able to access should they lose the file server in their Active Directory site. If you think about certain folders that have really large quantities of data or really big files over a low latent network connection, you might wanna exclude those from users being able to connect to them. The net result would be that users would still be able to have fault tolerance for their connection to their folders but the amount of time it would take to copy that content to this local site over that latent connection is perhaps more than the users would just simply tolerate. You have to be kind of careful here with this referral settings so that you don’t end up creating a cascading problem that starts with a loss of a server in your local Active Directory site.

DFS / R TROUBLESHOOTING
So we’ve gone through and we’ve set up DFS and DFS Replication. Hopefully by now you can see that it’s reasonably straightforward once you get your head around the various constructs and approaches for doing it. But happens when things go wrong? The last thing we need to check is how we can troubleshoot DFS and DFS Replication.
We’ll start off by looking at a tool called DFSDiag, and then we’ll look at another tool we can use to troubleshoot called DFSUtil. Open powershell as admin and type in DFSDIAG /? to see the options. Here we can see we’ve got various checks that we can do. So we can test the domain controllers, the sites, the DFS config, integrity, etc.,

Command that we need to run here is dfsdiag /testreferral and this command will give us cover all the checks above.
So the command is dfsdiag /testreferral /DFSPath:\<namespace name>
So the first check that’s happening here is the TestDcs, and among other things this is checking that the Windows service, that is the DFS Namespace service, is running on the domain controllers, and that the startup type is set to automatic. The next check is the TestSites check, and one of the things this is doing is just checking on the domain controllers to make sure that the namespace servers have got the same site associations across all the DCs. The next is the TestDfsConfig switch, and this is checking that the DFS Namespace service is running on the namespace servers themselves, and it’s also checking the registry configuration that’s consistent amongst the namespace servers. And the next check, the TestDfsIntegrity is, among other things, checking that the DFS metadata is not corrupt, and is consistent amongst the domain controllers. So from a DFSDiag point of view, everything looks fine here

Next tool we can run is dfsutil
What this is going to return is a list of all the DFS targets, whether they’re online, and also the site that they’re associated with. So, at a glance you can go through and you can look through all the target referrals.

TROUBLESHOOTING REPLICATION
There’s a number of tools and utilities that we can use, but we’re going to start by looking at the diagnostic reports that you can generate from within the DFS Management console, and then we’ll take a look at the DFSRDiag utility. Don’t forget to check Event logs as well.
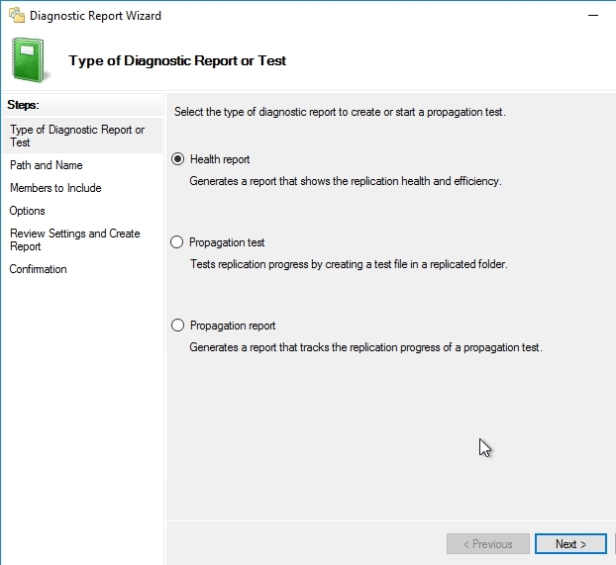
Let’s start with running Diagnostic Reports. Open DFS Management Console –> Expand the replication node and right click on your replication group and select Create Diagnostic Report
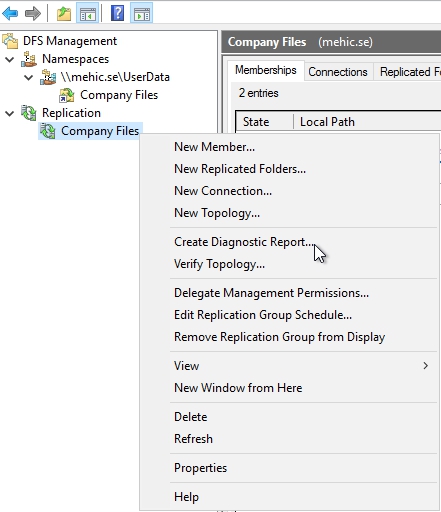
Here we have three options. I can generate a Health report, I can generate a Propagation test, and then I can generate a Propagation report based on the test. Let’s start with Health Report, Click Next
Now I have the option to choose where I want the report to be saved, and in this case I’ll just save it to the default location on the C Drive, click next

I’m going to select all the members of this replication group, click next

And here it’s asking whether I want to include any files which are currently backed up or back-logged in the report, and I’ll just select the defaults and click Next and create

When you click create it will generate a health report. and to be able to see everything you will need to select Allow blocked content.

And this is a really useful report, because it’s giving me a status of the current replication. We can see that there are no errors. You can expand it and check the info or warnings.

If we expand for example Informational, we can see more info in terms of the uptime of the service, it’s telling me whether the service status is normal, and it’s even telling me the number of files received. Now the next thing it’s showing me is the Replication Bandwidth Savings. So the Bandwidth Savings relate to the fact that when you make a change to a file, DFS only replicates that change, and not the whole file itself, so it’s using that to work out the bandwidth savings, because it’s saying that we don’t need to replicate the whole file when it’s changed, we’re just going to replicate the individual bytes that have changed, and if you scroll up it will give you a graph.

To avoid running all the test I will explain what they mean.
Propagation Test –> So what a propagation test does is it actually corrects a hidden file on the server that you select as being the propagation server, and then it will replicate that file, or I should say, DFS Replication will replicate that file out to the other members. It will give you summary and you will see if it is success or failed.
Propagation report –> When we run this test we will see what happened as part of the propagation test above. It’s going to give you detailed info and a really useful graph of how long it took to carry out that last replication test.
VERIFY TOPOLOGY
Next thing you can do to test the replication is the Verify Replication Topology

So, what this does is this checks to ensure that we have enough connections in place between the members so that replication can happen throughout the topology. So if I select Verify Topology, it’s showing here that the topology is fully connected.

EVENT VIEWER
The last tool we’ll look at for troubleshooting is the Windows Event Log, so this should really form part of any troubleshooting process that you have within DFS. Under Application and Services Logs, we’ll find that there’s actually a DFS Replication container that contains all the events that pertain to DFS Replication.

That’s it. I hope you have enjoyed reading and learning DFS and DFSR.
No comments:
Post a Comment