How to Install and configure Active Directory Domain Services 2016

In previous post we installed windows server 2016. Now we will move forward and install Active Directory Domain Services and configure it.
Server info:
DC01, 4GB RAM, 4vCPU
IP: 192.168.0.20
Let’s get started.
Log in as administrator and start Server Manager.

Go to Manage –> Add Roles and Features or click on the second option in Quick Start.

In the wizard on the Before you begin page click on next.

In installation type selection, leave the default selection and click on next.

In server selection, leave the default selection and click on next.

From the role selection click on Active Directory Domain Services and click on next. Then it will ask to add additional features. Click on add features and click on next.

In the features selection we will keep the default settings and click on next

On the description page click next to proceed.

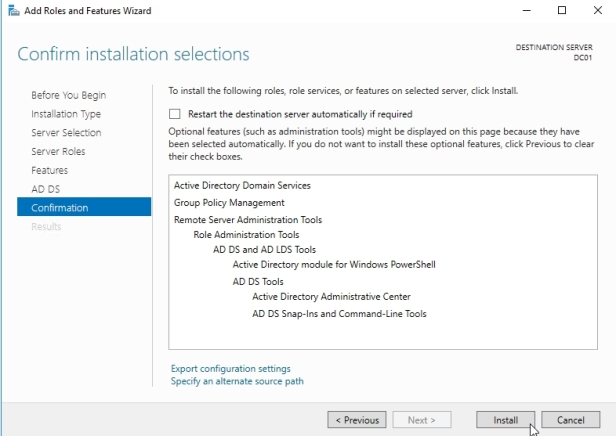
On the confirmation page click install.
On the Results page click Promote this server to a domain controller.

OBS!!! If you close the wizard without clicking on Promote this server… you can get it back by clicking on Tasks in Server Manager.

It will open up the new wizard for the additional AD DS configuration.
I will deploy new forest. (In my case it will be MEHIC.SE)

Select the domain and forest functional levels (Windows Server 2016) and specify DSRM Password.
Directory Services Restore Mode (DSRM) is a safe mode boot option for Windows Server domain controllers. This password provides the administrator with a back door to the database in case something goes wrong later on, but it does not provide access to the domain or to any services.

On the DNS selection page click on next. The message can safely be ignored.

On the Additional Options page click on next.

Leave the default settings and click on next

Next page gives us option to review the configuration. As an added bonus, When clicking View Script button you are provided with the PowerShell script to automate future installations.

Should all the prerequisites pass, click the Install button to start the installation.

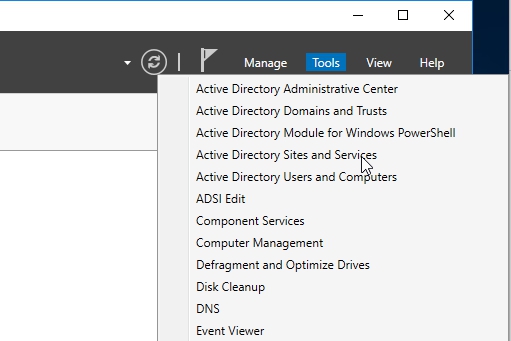
It will reboot server automatically once completed. To verify that everything is installed and working click on Tools and you will find few AD DS Microsoft Management Console (MMC) snap-in that you can use to administer and publish information in the directory.
This completes installation process.
In the next part of this series we will extend our configuration by Installing and configuring Active Directory Certificate Services.
No comments:
Post a Comment